
For Those Who Are Living in the Streets:
How to Make Makeshift Stoves

Here’s a simple way to create a makeshift stove using items that can often be found on the street:
Materials Needed:
– Tin Can: A large, empty tin can (like a coffee can) works well.
– Can Opener: To create ventilation holes.
– Wire Hanger: For a support grill (optional).
– Alcohol-Soaked Cotton Balls: As a fuel source.
Steps:
1. Prepare the Tin Can:
– Remove the lid from the can using a can opener, but keep it for later use.
– Use the can opener to punch several holes around the top edge of the can, just below the rim. This will allow air to flow and feed the fire.
2. Create a Ventilation System:
– Punch several holes near the bottom of the can to allow air in. This helps with proper airflow and keeps the fire burning.
3. Fuel Source:
– Take the alcohol-soaked cotton balls and place them inside the can. If you don’t have alcohol-soaked cotton balls, you can use dry twigs, paper, or other small, dry materials that burn easily.
4. Ignite the Fuel:
– Light the cotton balls with a match or lighter. Be cautious, and ensure you are in an open, ventilated area away from flammable materials.
5. Cooking Surface (Optional):
– If you have a wire hanger, you can cut and bend it to create a small grill to place over the top of the can. This can serve as a cooking surface for small pots or pans.
6. Safety:
– Always use the makeshift stove in an open and ventilated area. Ensure it is stable and away from any flammable materials. Keep a safe distance and never leave the stove unattended while in use.
Here’s a simple method to create a makeshift stove using bricks, which can be quite effective and durable:
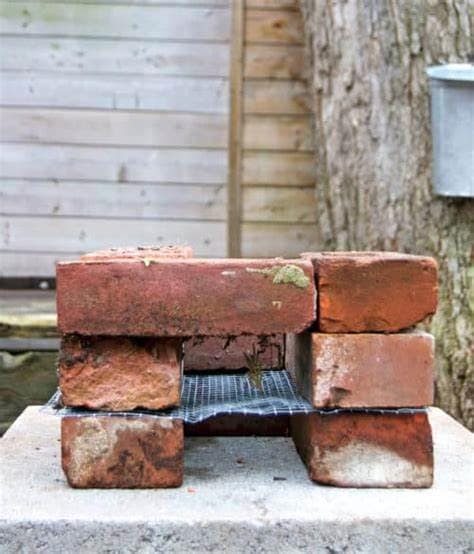
Materials Needed:
– Bricks: At least 4-6 standard bricks.
– Kindling and Fuel: Small twigs, dry leaves, paper, and larger pieces of wood.
– Lighter or Matches: To ignite the fire.
Steps:
1. Select a Location:
– Find a flat, stable, and open area away from flammable materials. Ensure good ventilation to avoid smoke buildup.
2. Arrange the Base:
– Place two bricks parallel to each other, with a small gap in between to allow airflow. This forms the base of your stove.
3. Create the Sides:
– Place two more bricks on top of the base bricks, standing vertically on their sides. These will form the walls of your stove. Leave enough space in the middle for fuel and airflow.
4. Top Brick (Optional):
– You can place an additional brick horizontally across the top to create a surface for pots or pans. Ensure it’s stable and balanced. Alternatively, you can place a metal grill or grate on top of the vertical bricks to hold your cooking vessel.
5. Add Kindling and Fuel:
– Place kindling (small twigs, dry leaves, paper) in the gap between the vertical bricks. Gradually add larger pieces of wood as the fire gets going.
6. Ignite the Fire:
– Light the kindling with a lighter or matches. Ensure that the fire has enough airflow by adjusting the placement of the bricks if necessary.
7. Safety:
– Always use the makeshift stove in a safe and open area. Keep a close eye on the fire and never leave it unattended. Have water or a fire extinguisher nearby in case of emergencies.
Cooking:
– Once the fire is stable and burning well, you can place a pot or pan on the top brick or grill to cook your food.
This makeshift brick stove is a reliable and simple solution for cooking outdoors. Always prioritize safety and ensure the fire is completely extinguished after use.
In this context, I was referring to standard bricks, which can include various types such as clay bricks or concrete bricks (also known as cinder blocks). Both types can be used to create a makeshift stove.
Types of Bricks:
– Clay Bricks: Traditional red bricks commonly used in construction.
– Concrete Bricks (Cinder Blocks): Larger, hollow blocks made of concrete. They are sturdy and often used for more robust structures.
For a makeshift stove, either type can work on using cinder blocks specifically:
1. Select a Location:
– Find a flat, stable, and open area away from flammable materials. Ensure good ventilation to avoid smoke buildup.
2. Arrange the Base:
– Place two cinder blocks parallel to each other, with a small gap in between to allow airflow. This forms the base of your stove.
3. Create the Sides:
– Place two more cinder blocks on top of the base blocks, standing vertically on their sides. These will form the walls of your stove. Leave enough space in the middle for fuel and airflow.
4. Top Surface (Optional):
– You can place an additional cinder block horizontally across the top to create a surface for pots or pans. Ensure it’s stable and balanced. Alternatively, you can place a metal grill or grate on top of the vertical blocks to hold your cooking vessel.
5. Add Kindling and Fuel:
– Place kindling (small twigs, dry leaves, paper) in the gap between the vertical blocks. Gradually add larger pieces of wood as the fire gets going.
6. Ignite the Fire:
– Light the kindling with a lighter or matches. Ensure that the fire has enough airflow by adjusting the placement of the blocks if necessary.
7. Safety:
– Always use the makeshift stove in a safe and open area. Keep a close eye on the fire and never leave it unattended. Have water or a fire extinguisher nearby in case of emergencies.
Using cinder blocks can create a more stable and durable stove, ideal for outdoor cooking in emergency situations.
Gathered from the Internet by the Street Sentinel